Showing posts with label health. Show all posts

Monday, August 12, 2013

{My Month in Review}

I was a vendor at Nampa's Art Festival this year and shared a booth with 3 other wonderful artists - this is my table.

this little moth loved our booth

His wings reminded me of bits of twigs

He loved my dolls too

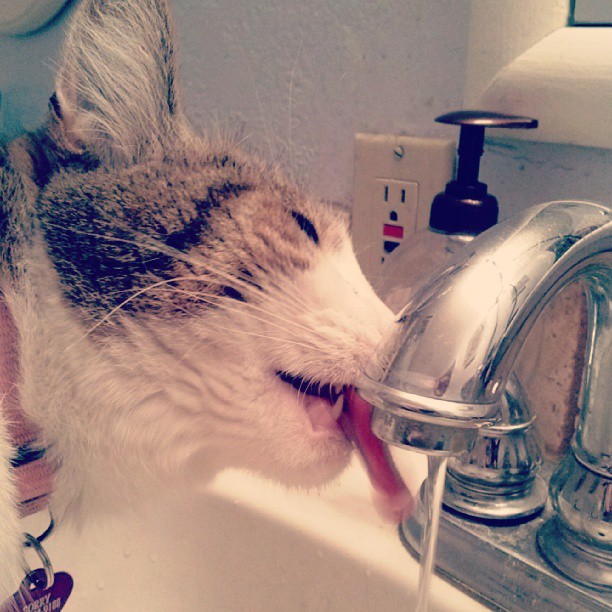
Sorry loves drinking out of the faucet, she prefers her water strait from the tap

I asked Myrna to quit moving but as you can see, she doesn't listen

I just adore this little face


She finally crashed in my lap

My hair is now long enough for pigtails

this is what I wore for my booth since most of the other booth mates were steampunkers
I made 3 ingredient banana cookies: 1 cup oatmeal, 2 smushed up bananas and a handful of chocolate chips mix well then bake at 350* for 15 min.

dehydrated some ripe bananas for the kids

this is my new to me dehydrator

mmmm, banana chips!

Monday, July 22, 2013

{The Reason for the 7 month blog escape}

Credit
Wow, it doesn't really seem like I was gone a whole seven months, but I was. There were several factors in my sudden disappearance from blog land one being that I was over stressed at home with so many people living with us and between the chaos they all brought and the upheaval it brought into my home I think I started to pull further and further into myself and away from the things and people I enjoyed. 

I know I have depression tendencies but can mostly stave them off with some "ME" time, although now I realize I never got my "ME" time but at the time I couldn't seem to figure out why I was spiraling. I pulled away from everything, including photography and my camera. My crafting suffered as well and it didn't help that my carpal tunnel was making it harder to create the items I love which in turn made me sink further into my own self pity. Of course this only hindered everything else in my life too.

I didn't realize how much my life was being bogged down by the constant stream of guests in and out of our home until after they were all gone and suddenly I could breathe again and finally my house was my home and sanctuary again! It's only been a few months of NO GUESTS but I can feel myself getting back to normal. I am even picking up my camera again editing them in a timely manner. 

My depression is still here but it's fading and though I know it won't ever fade and will come back in spurts, I don't want to feel so alone while surrounded by so many again. I haven't felt that way in a very long time and I don't ever want to feel that way again. Slight depression is what I am more capable of dealing with and living with and can manage. What I was mired in during the past seven months was exhausting and overall draining. I'm glad I am pulling out of it.

My goal is to start posting once or twice a week and work my way back up to daily posts about the happenings in my chaotic little world. I also hope to get back into the things that I pulled away from during the past seven months. 

I know the next few months will be a crazy as I try to get into a homeschooling routine with the kids and get myself back into a good frame of mind to enjoy my life to the fullest again. I am hopeful and know because I can breathe again life will become easier and the goals I set will be achieved.

So starts my journey to a better mental state, better health and overall happiness and joy for life that I lost and want to regain back.

Thursday, December 20, 2012

{Self Love}


Hi, I'm Arya and I have just turned THIRTY THREE!!! I am happy to say that fashion wise I finally bought a pair of "jeggings" (jeans meets stretch pants) for the first time and I normally wouldn't wear them but stepped out of my comfort zone and took a leap on a black pair. They are comfortable and I LOVE how I look in them. I also LOVE that I am starting to feel comfortable in my skin and not just feel like some skinny girl trapped in a fat girl body - I actually like how my style is evolving and how I am now able to wear more fitting clothes that show my curves instead of wearing too big clothes that make me look like I threw a king size blanket on as a shirt.

I am enjoying life and trying not to let the little stuff slow me down and sure I want to lose weight and I actually have lost 15 lbs so far but regardless of if I make it to my goal or not I am happy with the body I have. It's amazing and gave life to my four babes, how could I not love it.

Thirty three has started off with a huge bang of SELF LOVE!! Stop the negative/hate talk in your head and start to replace it with positive/loving talk. As women I find we tend to be harder on ourselves and more critical of our bodies because of all the excessive media out there talking about how we need to be a size 2 to be happy. Well, I am here to tell you that you don't. Be happy with yourself and others will want to be around you because of it. 

Just be happy with where your at, even if you want to change it, love yourself at whatever stage your at in your journey and remember your not alone. Some days are going to be harder then others but always try to say something nice about your body before you go to bed and again when you wake up and soon those negative thoughts will fade and be replaced with wonderful positive thoughts and one day you will just look at yourself and know how beautiful you really are.

I have been married to my hubby for almost 13 years and for most of that time I hated how I looked and hated the curves and rolls that seemed to take over my body, especially after being pregnant nine times. And I would make comments about how hideous I was or how cow like I had become and it drove my husband nuts because he only ever saw me as sexy and beautiful and couldn't understand why I didn't see what he saw.

Now, after all that time, I see that I am sexy and beautiful and worthy of his love and worthy of my own love too. I now knows and see what my loving husband has always seen. A FREAKINGLY FABULOUS CURVY WOMAN!! 


I am BEAUTIFUL. I am LOVED. I am WIFE. I am MOTHER. I AM DESIRED!!

Saturday, May 5, 2012

{Self Worth}

I don't know about you but I have been feeling un-attractive and very un-beautified. I had a realization yesterday as I was shopping and thrifting that I am letting my own feelings of non-worth and un-attractiveness to effect every aspect of my life - including my relationship with my husband.

My low self esteem and poor body image are contributing to my overall depression and making intimate moments very uncomfortable for me.

I realized this while I was doing my "Mother's Day" clothes shopping (hubs gift to me) and while trying on the clothes I started to feel like my old self and realized too that I am not taking the time to pamper and keep up on my appearance like I used to and because I have fallen into a rut I needed to shake things up and start pampering/taking time for me.


Got my hair did and makeup on


Taking time and energy for myself isn't selfish (although I do feel guilty about it). I know that if I take the time to take care of me I can better take care of every aspect of my life including my family and more importantly my husband.

I bought clothes that made me feel pretty and attractive and while shopping for diapers I picked up a little bit of makeup (mascara, eye shadow and a touch of blush) and while thrifting I found some cute shoes that were comfy and curlers so I could do more with my hair then just pull it into a pony tail.

the dress I got from Lane Bryant along with the shrug and pink cami

this dress makes me feel pretty


I need to start pulling myself out of this rut and I think I have made a huge first step in fixing my self worth and the image of who I am now. I need to start being happy with ME and once I start to like myself again I know I will be able to change things that I don't like instead of letting it get me down.

But first I need to start liking who I am and what I look like and know that my husband loves me and is still attracted to me.

Monday, April 2, 2012

{I made Pinterest!}

I have like twelve boards over at pinterest, one of which is "for the kitchen" and I have been baking some recipes that I have "pinned". Below are a few that I have tried.

I am working on getting healthy and making a lifestyle change that includes getting rid of foods that contain all the preservatives, additives, dyes and unnecessary fats/sugars . I am buying "organic" (YES, I am becoming a HIPPIE - get used to it!) and wholesome foods and if I do buy something in a jar it has to have ingredients I can read and I don't buy things with "high fructose corn syrup" in it because the corn syrup (most of it anyways) is from Genetically Engineered Corn and I want to keep that stuff off our plates and just stick to the basics.

Ya know like our grand parents and great grand parents used to eat - Milk from the dairy man in a glass jar, foods grown without lots of herbicides/pesticides and without given growth hormones or excessive antibiotics. Food that looks and smells and TASTES good. Food that I can be proud to serve my family.

We are not going to be going to restaurants be it fast food or a sit down place because we don't know where they get their food or what they are putting into our food. I want control over what goes into our bodies and since having my kids I have been doing them a huge disservice in regards to what I have let them shove into their mouths.

I gotta tell you that since changing what I am buying and cutting out all the CRAP that I couldn't read on a label my kids behavior has begun to improve, they are less grouchy and don't fight as much (don't misunderstand they still fight, they're siblings, but it's not as much as they did a month ago) and I am loving the change.

I am aslo starting to look into Nutrition based healing because I feel that I am lacking in some things and want to explore my options instead of just relying on my doctor to tell me what to do and I sure don't want to be put on medications that I may not even need. I am interested in the Gerson Theory and want to look more into it since most doctors don't always go the natural route and like to dole out prescriptions like they are candy.

Don't get me wrong, I think doctors are great at helping and healing in most ways but I would rather heal naturally then be given a pill that I could have a bad reaction too (which as I get older I am finding I am having reactions to medications I didn't have say 2 years ago).

Well enough about my hippi-fication and onto the recipes!

My first batch of homemade tortilla's!! YUMMY!!
My first try was tortillas made by Home Sick Texan and I must say this recipe made it into my recipe binder!

Texas Flour Tortillas  (makes 8 tortillas)


Ingredients:
Two cups of all-purpose flour (can make them whole wheat by substituting one cup of whole-wheat flour for white flour)
1 1/2 teaspoons of baking powder
1 teaspoon of salt
2 teaspoons of vegetable oil
3/4 cups of warm milk

Method:
Mix together the flour, baking powder, salt and oil.
Slowly add the warm milk.
Stir until a loose, sticky ball is formed.
Knead for two minutes on a floured surface. Dough should be firm and soft.
Place dough in a bowl and cover with a damp cloth or plastic wrap for 20 minutes.
After the dough has rested, break off eight sections, roll them into balls in your hands, place on a plate (make sure they aren’t touching) and then cover balls with damp cloth or plastic wrap for 10 minutes. (It’s very important to let the dough rest, otherwise it will be like elastic and won’t roll out to a proper thickness and shape.)
After dough has rested, one at a time place a dough ball on a floured surface, pat it out into a four-inch circle, and then roll with a rolling pin from the center until it’s thin and about eight inches in diameter. (If you roll out pie crusts you’ll have no problem with this.) Don’t over work the dough, or it’ll be stiff. Keep rolled-out tortillas covered until ready to cook.
In a dry iron skillet or comal heated on high, cook the tortilla about thirty seconds on each side. It should start to puff a bit when it’s done.
Keep cooked tortillas covered wrapped in a napkin until ready to eat.
Can be reheated in a dry iron skillet, over your gas-burner flame or in the oven wrapped in foil.

I hate my cell phone camera sometimes...it wasn't really this yellow but it was delish!


My next attempt was a Chicken Hand Pocket made by Sophistimom


chicken hand pies or chicken pasties


1 medium potato, peeled and diced
1 tablespoon olive oil
1 small onion, finely diced
1 stalk celery, finely diced
2 large carrots, chopped
1 tablespoon butter
1 tablespoon unbleached all-purpose flour
1 14 ounce (400mL) can low sodium chicken stock
1 bouillon cube (I actually prefer Better than Bouillon–just use a tablespoon)
salt and pepper to taste
1-2 boneless skinless chicken breasts, cut into 1/2 inch pieces
pastry dough (recipe follows)
1 egg, plus a teaspoon of water, beaten


1. Place potatoes in a medium saucepan, and cover with water. Bring to a boil over high heat. Cook until potatoes are tender to the point of a knife. Drain and set aside. While the potatoes cook, set a large skillet over medium low heat and add in the olive oil, onion, celery, and carrots. Cook until onions are very tender, about 12-15 minutes.
2. Melt butter into the mixture and stir in flour. Let cook for 2 minutes or so, just to let the flour taste cook out. Pour in about half of the can of chicken stock. Add the bouillon and potatoes. Let simmer a few minutes and taste for flavor. Add salt and pepper if needed. Add in chicken and simmer until cooked through. The mixture should be thick, but not too dry. Add more chicken stock until you achieve the desired consistency (I used the whole can). Store mixture in refrigerator until ready to use (the pies are easier to make if the filling is cold).
3. Preheat oven to 425 degrees (220 degrees celsius). Place a piece of parchment paper in a baking sheet and set aside. Roll out the pastry dough on a floured board into an 18×22 inch rectangle (don’t measure! just guess). Cut in half, and then cut each half in thirds, to make 6 equal smaller rectangles.
4. Spoon 1/4 cup (about 4 tablespoons) of the chicken mixture onto one of the rectangles of dough, placing it slightly off center. Wet the edges of the dough with a pastry brush and water, and fold the longer end of the pastry up and over the filling. Press the dough down to seal it, and then crimp with the edges of a fork. Place on the prepared baking sheet. Make two incisions in the top of the pastry with a sharp knife, and brush with the beaten egg and water. Repeat with remaining 5 pastries. Refrigerate for at least 30 minutes.
5. Bake for 15-20 minutes, or until the pastry is golden brown and puffed.

pastry dough


2 1/4 cups unbleached all-purpose flour
1 1/2 teaspoons salt
1 teaspoon sugar (optional)
1 stick (112g) cold unsalted butter, cut into 1/2-inch cubes
1 egg, slightly beaten
1/3 cup ice cold water


1. In a food processor fitted with the blade attachment, pulse together the flour, salt, and sugar. Add in the butter, and pulse a few times until the mixture is crumbly and resembles coarse meal. Combine the egg and water in a container (remove all ice pieces). While the processor is running, pour the water/egg mixture in and pulse until mixture just comes together.
2. Pour mixture out onto a floured board and knead a few times to bring all the ingredients together. Dough can be rolled out immediately, or it can be wrapped in plastic and refrigerated for up to 2 days.

Hubby liked it and so did Myrna...the older kids weren't up to taste it but they will in the morning!
My last try for the day was some Vanilla pudding made by Mel's Kitchen Cafe. I added a bit of cinnamon to mine and maybe later in the week I will try making the chocolate pudding too.

Homemade Chocolate Pudding
*Makes about 4 cups of pudding
1/4 cup packed light brown sugar
3 tablespoons unsweetened cocoa powder (Dutch-process or regular)
3 tablespoons cornstarch
1/4 teaspoon salt
2 3/4 cups whole milk
1/4 cup heavy cream
1 cup milk chocolate chips (or 6 ounces bar milk chocolate chopped)
1/2 teaspoon vanilla extract
In a large saucepan, combine the brown sugar, cocoa, cornstarch and salt, whisking lightly. Whisk in the milk and cream to the sugar mixture until it is smooth. Stir in the chocolate chips and bring the mixture to a simmer over medium heat, whisking or stirring occasionally. Once the mixture is at a simmer, reduce the heat to medium-low and cook, whisking constantly, until the mixture is thickened and large bubbles pop at the surface, 2 to 3 minutes. Take the pot off the heat and stir in the vanilla.
Transfer the pudding to a large bowl and cover with plastic wrap, pressing the plastic wrap directly onto the surface of the pudding to avoid a skin starting to form. Refrigerate the pudding until it is completely cool, at least 4 hours but up to 3 days, if it is stored in an airtight container. Serve with a dollop of whipped cream...or not.


Related Posts Plugin for WordPress, Blogger...